
この記事はPart1の続きである.
まず下記リンクを参照されたい.

Reactチュートリアル
三目並べを完成させる
ここまでで基本的な部品が揃った.これらの部品を使用して,三目並べを完成させる.
9マスの状態を管理する機能を作成する.
現在,各マス目の状態(値)はSquareコンポーネントが保持している.最終的にこのゲームの勝者を判定する必要があり,9マスの情報を管理する機能が必要となる.
まず,マス目の管理用はArrayの定義とする.renderSquareが定義したArrayから値を読み込むように変更する.
- 2-7行目
9マスの値を保存するArrayを定義 - 10行目
Arrayから値を読み込むように変更
class Board extends React.Component {
  constructor(props) {
    super(props);
    this.state = {
      squares: Array(9).fill(null)
    };
  }

  renderSquare(i) {
    return <Square value={this.state.squares[i]} />;
  }
  ...
}マス目がクリックされたときに,マス目を管理するBoardコンポーネントのArrayの値を変更する必要がある.Boardコンポーネントのstateはプライベートなため,SquareからBoradのstateの値を変更することができない.
そのため,BoardからSquareにhandleClickを通じて値を渡す.
class Board extends React.Component {
  constructor(props) {
    super(props);
    this.state = {
      squares: Array(9).fill(null)
    };
  }

  renderSquare(i) {
    return (
      <Square
        value={this.state.squares[i]}
        onClick={() => this.handleClick(i)}
      />
    );
  }
  ...
}現在のコードでは,BoardからSquareにvalueとonClickの2つのpropsを渡している.
ここで,Squareプロパティに以下のような変更を加える.
Squareコンポーネントのthis.state.valueをthis.prop.valueに変更する.Squareコンポーネントのthis.setState()をthis.prop.onClick()に変更する.Squareコンポーネントはもはやstateを必要としないため,constructorを削除する
class Square extends React.Component {
  render() {
    return (
      <button
        className="square"
        onClick={() => this.props.onClick()}
      >
        {this.props.value}
      </button>
    );
  }
}Boardコンポーネントがマス目の値を管理し,Squareコンポーネントのstateを読み込まないため,が不要となった.
現時点でのコードに関してまとめると
- DOMコンポーネント(ReactDOM)の
<button>にonClick - ボタンがクリックされると
Square内のrender()メソッドに定義されているonClickが呼ばれる. - このイベントハンドラが,
this.props.onClick()を呼び出す. BoardはSquareにonClick={() => this.handleClick(i)}を定義しているので,Squareがクリックされたときにthis.handleClick(i)を呼び出す.this.handleClick(i)に関して,現時点では定義していないためクラッシュする.
次に,handleClick(i)を定義する.
class Board extends React.Component {
  constructor(props) {
    super(props);
    this.state = {
      squares: Array(9).fill(null)
    };
  }

  handleClick(i) {
    const squares = this.state.squares.slice();
    squares[i] = "X";
    this.setState({ squares: squares });
  }

  renderSquare(i) {
    return (
      <Square
        value={this.state.squares[i]}
        onClick={() => this.handleClick(i)}
      />
    );
}ここまでの変更で,「Squareコンポーネントがsteteを管理する」状態から「Boardコンポーネントがstateを管理し,SquareコンポーネントはクリックされたことをBoardに伝える」という構造になった.
この状態のSquareコンポーネントのことを,React用語では’Controlled component’と呼ぶらしい.
現時点のコードは以下のようである.
import React from "react";
import ReactDOM from "react-dom";
import "./styles.css";

class Square extends React.Component {
  render() {
    return (
      <button className="square" onClick={() => this.props.onClick()}>
        {this.props.value}
      </button>
    );
  }
}

class Board extends React.Component {
  constructor(props) {
    super(props);
    this.state = {
      squares: Array(9).fill(null)
    };
  }

  handleClick(i) {
    const squares = this.state.squares.slice();
    squares[i] = "X";
    this.setState({ squares: squares });
  }

  renderSquare(i) {
    return (
      <Square
        value={this.state.squares[i]}
        onClick={() => this.handleClick(i)}
      />
    );
  }

  render() {
    const status = "Next player: X";

    return (
      <div>
        <div className="status">{status}</div>
        <div className="board-row">
          {this.renderSquare(0)}
          {this.renderSquare(1)}
          {this.renderSquare(2)}
        </div>
        <div className="board-row">
          {this.renderSquare(3)}
          {this.renderSquare(4)}
          {this.renderSquare(5)}
        </div>
        <div className="board-row">
          {this.renderSquare(6)}
          {this.renderSquare(7)}
          {this.renderSquare(8)}
        </div>
      </div>
    );
  }
}

class Game extends React.Component {
  render() {
    return (
      <div className="game">
        <div className="game-board">
          <Board />
        </div>
        <div className="game-info">
          <div>{/* status */}</div>
          <ol>{/* TODO */}</ol>
        </div>
      </div>
    );
  }
}

// ========================================

ReactDOM.render(<Game />, document.getElementById("root"));
onClickをmyOnClickとして変更したコードを以下に示す.これは,上のコードと全く同じ挙動をするはずである.
import React from "react";
import ReactDOM from "react-dom";
import "./styles.css";

class Square extends React.Component {
  render() {
    return (
      <button className="square" onClick={() => this.props.myOnClick()}>
        {this.props.value}
      </button>
    );
  }
}

class Board extends React.Component {
  constructor(props) {
    super(props);
    this.state = {
      squares: Array(9).fill(null)
    };
  }

  handleClick(i) {
    const squares = this.state.squares.slice();
    squares[i] = "X";
    this.setState({ squares: squares });
  }

  renderSquare(i) {
    return (
      <Square
        value={this.state.squares[i]}
        myOnClick={() => this.handleClick(i)}
      />
    );
  }

  render() {
    const status = "Next player: X";

    return (
      <div>
        <div className="status">{status}</div>
        <div className="board-row">
          {this.renderSquare(0)}
          {this.renderSquare(1)}
          {this.renderSquare(2)}
        </div>
        <div className="board-row">
          {this.renderSquare(3)}
          {this.renderSquare(4)}
          {this.renderSquare(5)}
        </div>
        <div className="board-row">
          {this.renderSquare(6)}
          {this.renderSquare(7)}
          {this.renderSquare(8)}
        </div>
      </div>
    );
  }
}

class Game extends React.Component {
  render() {
    return (
      <div className="game">
        <div className="game-board">
          <Board />
        </div>
        <div className="game-info">
          <div>{/* status */}</div>
          <ol>{/* TODO */}</ol>
        </div>
      </div>
    );
  }
}

// ========================================

ReactDOM.render(<Game />, document.getElementById("root"));
Squareクラスコンポーネントを関数コンポーネントに変更
Squareクラスコンポーネントはstateを持たず,renderメソッドのみを有するため関数コンポーネントに変更することが可能である.関数コンポーネントに利点は,よりシンプルに記述できることである.
class Square extends React.Component {...}を以下のように変更する.
function Square(props) {
  return (
    <button className="square" onClick={props.onClick}>
      {props.value}
    </button>
  );
}
“X”, “O”が交互に入力されるようにする
現状のコードは,”X”のみが表示される.本来であれば”X”と”O”が交互に表示されなければおかしい.表示を制御するための変数xIsNextをstateに定義する.
class Board extends React.Component {
  constructor(props) {
    super(props);
    this.state = {
      squares: Array(9).fill(null),
      xIsNext: true,
    };
  }
  ...
}Squareがクリックされたとき,xIsNextの状態から”X”, “O”を判定し,xIsNextを更新する.
handleClick(i) {
  const squares = this.state.squares.slice();
  squares[i] = this.state.xIsNext ? "X" : "O";
  this.setState({
    squares: squares,
    xIsNext: !this.state.xIsNext
  });
}
さらに”X”に”O”の番手によってPlayer情報を書き出すようにする.
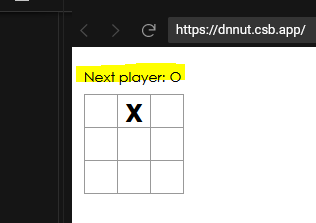
render() {
  const status = "Next player: " + (this.state.xIsNext ? "X" : "O");

  return (
    <div>
      <div className="status">{status}</div>
      <div className="board-row">
        {this.renderSquare(0)}
現状は以下のようなアプリケーションになっている.
現時点のコードは以下のようである.
import React from "react";
import ReactDOM from "react-dom";
import "./styles.css";

function Square(props) {
  return (
    <button className="square" onClick={props.onClick}>
      {props.value}
    </button>
  );
}

class Board extends React.Component {
  constructor(props) {
    super(props);
    this.state = {
      squares: Array(9).fill(null),
      xIsNext: true
    };
  }

  handleClick(i) {
    const squares = this.state.squares.slice();
    squares[i] = this.state.xIsNext ? "X" : "O";
    this.setState({
      squares: squares,
      xIsNext: !this.state.xIsNext
    });
  }

  renderSquare(i) {
    return (
      <Square
        value={this.state.squares[i]}
        onClick={() => this.handleClick(i)}
      />
    );
  }

  render() {
    const status = "Next player: " + (this.state.xIsNext ? "X" : "O");

    return (
      <div>
        <div className="status">{status}</div>
        <div className="board-row">
          {this.renderSquare(0)}
          {this.renderSquare(1)}
          {this.renderSquare(2)}
        </div>
        <div className="board-row">
          {this.renderSquare(3)}
          {this.renderSquare(4)}
          {this.renderSquare(5)}
        </div>
        <div className="board-row">
          {this.renderSquare(6)}
          {this.renderSquare(7)}
          {this.renderSquare(8)}
        </div>
      </div>
    );
  }
}

class Game extends React.Component {
  render() {
    return (
      <div className="game">
        <div className="game-board">
          <Board />
        </div>
        <div className="game-info">
          <div>{/* status */}</div>
          <ol>{/* TODO */}</ol>
        </div>
      </div>
    );
  }
}

// ========================================

ReactDOM.render(<Game />, document.getElementById("root"));
勝敗の判定
以下のような勝敗を判定するための関数をファイルに追記する.
この関数は,「現在の盤面に勝者がいるか確認し,勝者がいる場合”X”もしくは”O”を返し,いない場合nullを返す」ものである.
function calculateWinner(squares) {
  const lines = [
    [0, 1, 2],
    [3, 4, 5],
    [6, 7, 8],
    [0, 3, 6],
    [1, 4, 7],
    [2, 5, 8],
    [0, 4, 8],
    [2, 4, 6]
  ];
  for (let i = 0; i < lines.length; i++) {
    const [a, b, c] = lines[i];
    if (squares[a] && squares[a] === squares[b] && squares[a] === squares[c]) {
      return squares[a];
    }
  }
  return null;
}この関数をBoardコンポーネントのRenderで呼び出し,現在の盤面の情報を表示する.
- 勝者がいる場合,「Winner : “X”」 もしくは 「Winner : “O”」を表示
- 勝者がいない場合,「Next player : “X”」もしくは「Next player : “O”」
  render() {
    const winner = calculateWinner(this.state.squares);
    let status;
    if (winner) {
      status = "Winner: " + winner;
    } else {
      status = "Next player: " + (this.state.xIsNext ? "X" : "O");
    }

    return (
      <div>
        <div className="status">{status}</div>
        <div className="board-row">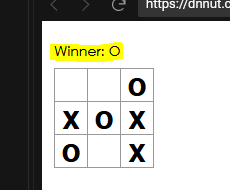
現コードでは,マス目に”X”もしくは”O”が入力されている場合でも,上書き入力できてしまうため,以下のように変更する
- すでに入力がある場合上書きできないようにする.
- 勝者がいる場合でも入力できないようにする
  handleClick(i) {
    const squares = this.state.squares.slice();
    if (calculateWinner(squares) || squares[i]) {
      return;
    }
    squares[i] = this.state.xIsNext ? "X" : "O";
    this.setState({
      squares: squares,
      xIsNext: !this.state.xIsNext
    });
  }
現時点でのコード
import React from "react";
import ReactDOM from "react-dom";
import "./styles.css";

function Square(props) {
  return (
    <button className="square" onClick={props.onClick}>
      {props.value}
    </button>
  );
}

class Board extends React.Component {
  constructor(props) {
    super(props);
    this.state = {
      squares: Array(9).fill(null),
      xIsNext: true
    };
  }

  handleClick(i) {
    const squares = this.state.squares.slice();
    if (calculateWinner(squares) || squares[i]) {
      return;
    }
    squares[i] = this.state.xIsNext ? "X" : "O";
    this.setState({
      squares: squares,
      xIsNext: !this.state.xIsNext
    });
  }

  renderSquare(i) {
    return (
      <Square
        value={this.state.squares[i]}
        onClick={() => this.handleClick(i)}
      />
    );
  }

  render() {
    const winner = calculateWinner(this.state.squares);
    let status;
    if (winner) {
      status = "Winner: " + winner;
    } else {
      status = "Next player: " + (this.state.xIsNext ? "X" : "O");
    }

    return (
      <div>
        <div className="status">{status}</div>
        <div className="board-row">
          {this.renderSquare(0)}
          {this.renderSquare(1)}
          {this.renderSquare(2)}
        </div>
        <div className="board-row">
          {this.renderSquare(3)}
          {this.renderSquare(4)}
          {this.renderSquare(5)}
        </div>
        <div className="board-row">
          {this.renderSquare(6)}
          {this.renderSquare(7)}
          {this.renderSquare(8)}
        </div>
      </div>
    );
  }
}

class Game extends React.Component {
  render() {
    return (
      <div className="game">
        <div className="game-board">
          <Board />
        </div>
        <div className="game-info">
          <div>{/* status */}</div>
          <ol>{/* TODO */}</ol>
        </div>
      </div>
    );
  }
}

function calculateWinner(squares) {
  const lines = [
    [0, 1, 2],
    [3, 4, 5],
    [6, 7, 8],
    [0, 3, 6],
    [1, 4, 7],
    [2, 5, 8],
    [0, 4, 8],
    [2, 4, 6]
  ];
  for (let i = 0; i < lines.length; i++) {
    const [a, b, c] = lines[i];
    if (squares[a] && squares[a] === squares[b] && squares[a] === squares[c]) {
      return squares[a];
    }
  }
  return null;
}
// ========================================

ReactDOM.render(<Game />, document.getElementById("root"));
「戻る」機能を実装する
記事が長くなってきたので,別ページに記載する.
下記リンクを参照されたい.
最後に
内容に誤りや不具合,ご意見があればコメントを残して頂けるとありがたいです


コメント